Streaming SSR 구현하기
목표
- Hono로 Node.js 서버를 구성합니다.
- Streaming SSR 구조를 작성하고 결과를 분석해봅니다.
전체적인 구조는 다음과 같습니다.

서버 구성하기
Node.js에서 Hono를 사용해 서버를 실행해봅시다.
ts
/** server.ts */

import { serve } from "@hono/node-server";
import { Hono } from "hono";

const app = new Hono();

// 3000 포트로 서버를 실행합니다.
serve(app, (info) => {
  console.log(`Server is running on http://localhost:${info.port}`);
});

app.get("/", (ctx) => {
  return ctx.text("Hello World");
});
개발 서버를 실행한 후 http://localhost:3000 접속하면 "Hello World" 문자열이 반환됩니다.
컴포넌트 작성하기
서버에서 렌더링 할 컴포넌트를 작성해봅시다. 컴포넌트는 구조는 다음과 같습니다.
- App: 최상위 컴포넌트입니다.
- TodoList: 비동기로 작성된 컴포넌트입니다. 내부의 비동기 작업은 2초 뒤 종료됩니다.
tsx
/** client.ts */

import React, { Suspense } from "react";
import { getTodoList } from "./lib";

async function TodoList() {
  const todoList = await getTodoList();

  return (
    <ul>
      {todoList.map((todoItem) => {
        return <li key={todoItem.id}>{todoItem.title}</li>;
      })}
    </ul>
  );
}

function App() {
  return (
    <div>
      <h1>Todo List</h1>
      <Suspense fallback={<div>loading...</div>}>
        <TodoList />
      </Suspense>
    </div>
  );
}

export default App;
App 컴포넌트를 서버에서 렌더링하면 렌더링 결과는 2단계로 나눌 수 있습니다.
- 초기 렌더링: loading... 문구가 표시됩니다.
- 최종 렌더링: TodoList 데이터가 표시됩니다.
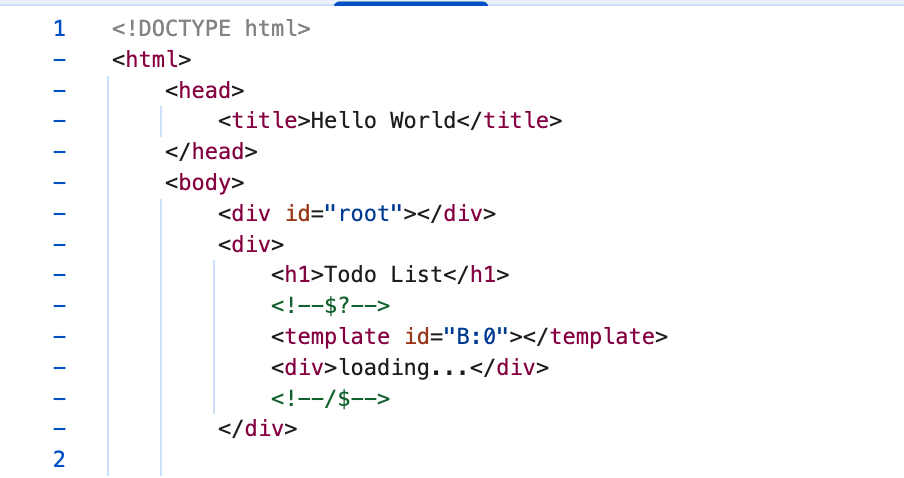
초기 렌더링
html
<!DOCTYPE html>
<html>
  <body>
    <div>
      <h1>Todo List</h1>
      <div>loading...</div>
    </div>
  </body>
</html>
최종 렌더링 (TodoList 비동기 작업 종료 후 시점)
html
<!DOCTYPE html>
<html>
  <body>
    <div>
      <h1>Todo List</h1>
      <div>
        <h1>Todo List</h1>
        <div>loading...</div>
        <ul>
          <!-- `getTodoList` 기반으로 생성된 li 목록 ... -->
          <li></li>
        </ul>
      </div>
    </div>
  </body>
</html>
이제 서버에서 React 컴포넌트를 streaming 렌더링하는 방법을 살펴봅시다.
서버에서 렌더링하기
React는 서버에서 컴포넌트를 렌더링 하기 위해 react-dom/server 기반의 서버 API를 제공합니다. Node.js를 사용하는 경우 renderToPipeableStream API를 사용해야 합니다.
stream 준비하기
App 컴포넌트를 stream 형태로 렌더링하고, 브라우저로 전송할 준비합니다.
ts
/** server.ts */

import { PassThrough, Readable } from "stream";

import ReactDomServer from "react-dom/server";

import App from "./client";

router.get("/", async () => {
  const element = createElement(App);

  const reactAppPassThrough = new PassThrough();
  const reactAppStream = Readable.toWeb(reactAppPassThrough);

  const { pipe, abort } = ReactDomServer.renderToPipeableStream(element, {
    onShellReady() {
      pipe(reactAppPassThrough);
    },
    onError(error) {
      reactAppPassThrough.destroy();
      abort(error);
    }
  });
});
onShellReady을 무엇인가요?
onShellReady함수는 서버에서 초기 렌더링 결과(Shell)가 생성했을 때 호출되는 콜백입니다.onShellReady함수가 호출되기 전 HTML의 기본구조<!DOCTYPE html>,<html>등을 chunk로 전송해야 합니다.
왜 PassThrough을 사용하나요?
stream을 직접 제어하기 위해 PassThrough 기반으로 stream을 중계합니다.
브라우저에 stream 전달하기
stream 기반의 통신을 위해서 데이터의 디코딩, 인코딩이 필요합니다. 관련 로직을 다음과 같이 작성해봅시다.
ts
const textDecoder = new TextDecoder();
const textEncoder = new TextEncoder();

// 인코딩 된 데이터를 디코딩 하는 함수
const decodeChunk = (chunk: unknown) => {
  if (chunk instanceof Uint8Array) {
    return textDecoder.decode(chunk);
  }

  return String(chunk);
};
브라우저에 전달할 stream 생성하여 브라우저에 반환해봅시다. stream이 데이터를 전송하는 시점은 3가지로 분리할 수 있습니다.
- 브라우저 stream 생성: HTML 시작 태그 chunk를 전송합니다.
- 중간: React 컴포넌트에서 생성된 chunk를 전송합니다.
- React stream 종료: HTML 종료 태그 chunk를 전송합니다.
ts
const header = `<!DOCTYPE html><html><head><title>Hello World</title></head><body><div id="root"></div>`;
const trailer = `</body></html>`;

app.get("/", async () => {
  // ...

  const onResponseStreamStart = async (controller: ReadableStreamDefaultController<unknown>) => {
    // [1] HTML 시작 태그 chunk 전달
    // // <!DOCTYPE html><html><head><title>Hello World</title></head><body><div id="root"></div>
    controller.enqueue(textEncoder.encode(header));

    // [2] React Stream chunk 전달
    try {
      let chunk;

      const reader = reactAppStream.getReader();

      // React 스트림 읽기
      while (true) {
        chunk = await reader.read();

        if (chunk.done) {
          break;
        }

        const decodedChunk = decodeChunk(chunk.value);
        controller.enqueue(textEncoder.encode(decodedChunk));
      }
    } catch (error) {
      controller.error(error);
    } finally {
      // [3] HTML 종료 태그 chunk 전달
      // </body></html>
      controller.enqueue(textEncoder.encode(trailer));
      controller.close();
    }
  };

  const responseStream = new ReadableStream({ start: onResponseStreamStart });

  return new Response(responseStream, {
    headers: {
      "Content-type": "text/html"
    }
  });
렌더링 결과 분석하기
App 컴포넌트가 Streaming SSR 기반으로 렌더링 된 결과를 살펴봅시다.
초기 렌더링
- Suspense 영역은 loading으로 표기되고, 나머지 영역은 초기 HTML에 포함됐습니다.
- index.html 요청에 대한 커넥션이 유지되고 있습니다.
최종 렌더링
- 2초 뒤 TodoList 목록이 HTML 응답에 포함됐습니다.
- index.html 요청에 대한 커넥션이 종료됐습니다.
- DOM 요소에
$RC함수를 통해B:0영역의 요소가S:0요소로 치환됐습니다.
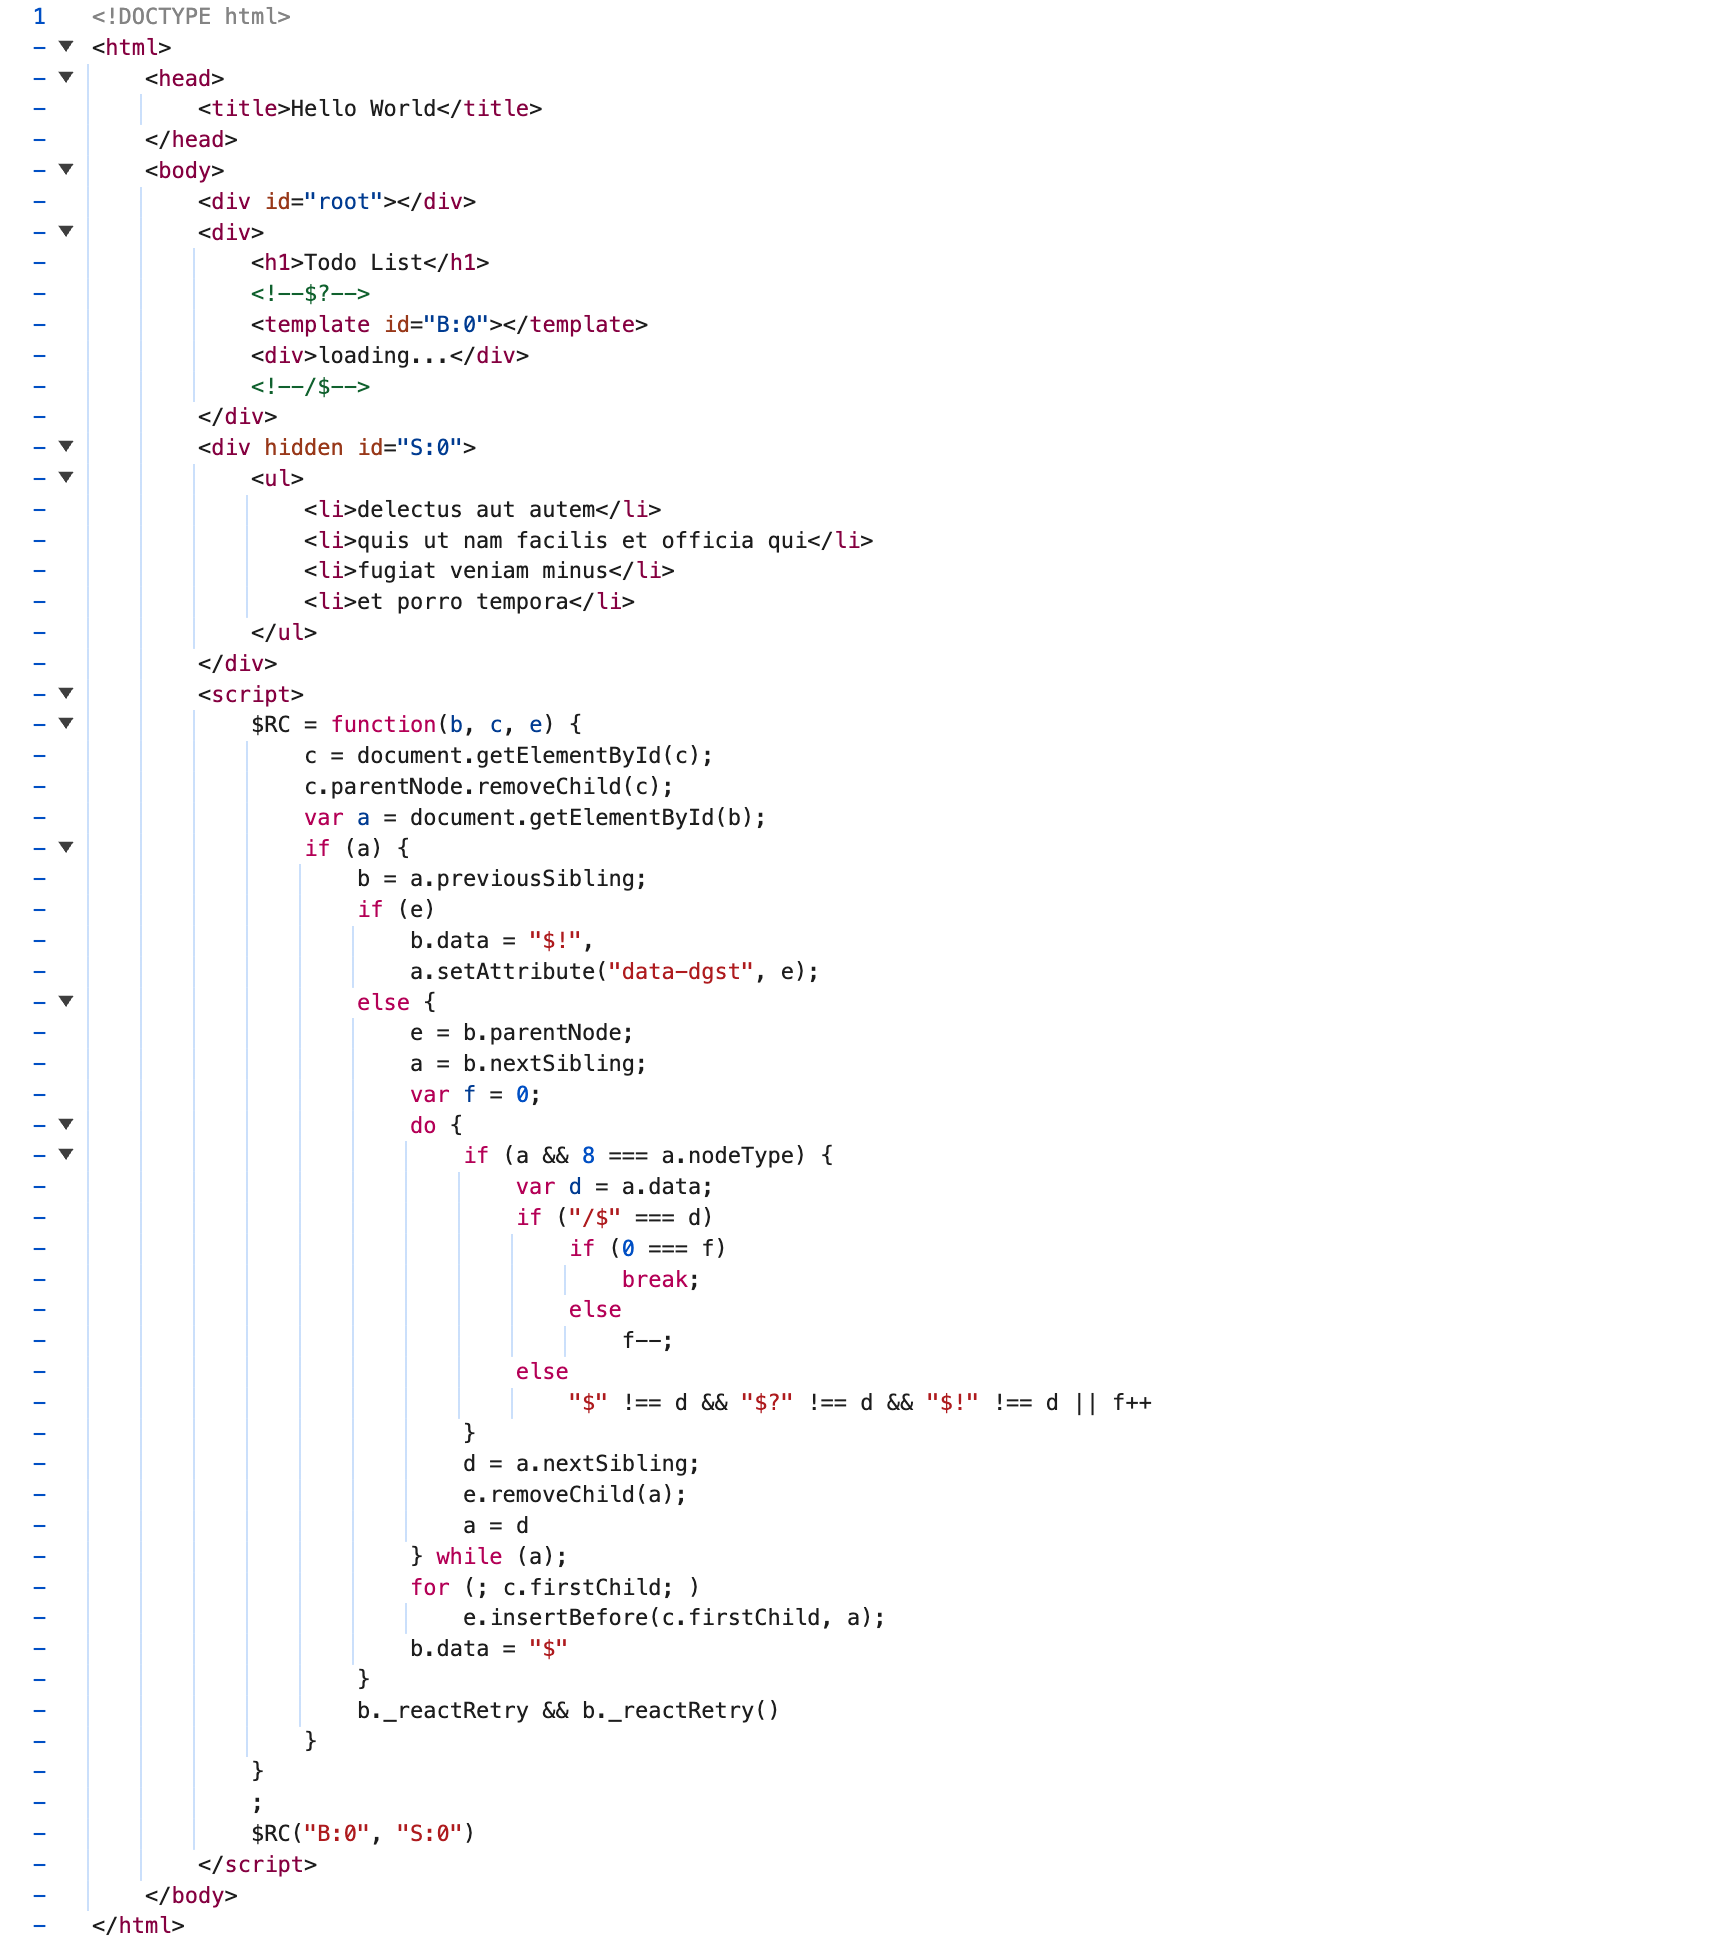
B:0, S:0, $RC 태그는 무엇인가요?
B:0,S:0,$RCReact Fizz에서 사용하는 용어입니다.- Fizz는 서버에서 React 컴포넌트를 렌더링하는 시스템입니다.
- Fizz는 초기 HTML과 함께 B:0(Boundary 시작), S:0(Segment 시작), $RC(React Component 렌더링) 같은 명령어를 전송합니다.
- 브라우저는 stream에 준비된 컴포넌트를 점진적으로 렌더링하고 서버에서도 Suspense를 지원합니다.
- 관련 코드는 https://github.com/facebook/react/tree/main/packages/react-server 에서 확인하실 수 있습니다.